The sun is the natural enemy of cinematic continuity, creating jarring changes in light quality and color that can ruin a scene. The solution is not to fight it, but to master the artifice of light. This involves using large-scale diffusion, precise color control, and strategic scheduling to create a seamless temporal illusion, turning environmental chaos into a controlled, consistent visual narrative.
There is no greater heartbreak for a cinematographer than watching a perfectly captured morning performance become unusable. The reason? The reverse shot, filmed hours later under a punishing midday sun, bears no resemblance to the soft light of the original take. This daily battle against the sun is the primary source of continuity errors on location. Even legendary productions are not immune; the filming of *Apocalypse Now* was so fraught with challenges that it holds a record for its staggering 456 continuity errors. While common advice suggests using reflectors or waiting for cloud cover, these are passive, often inadequate solutions for a professional set.
The true mastery of outdoor lighting continuity lies in a more profound philosophy. It’s not about documenting reality; it’s about creating a convincing illusion. This requires embracing the artifice of light, a proactive approach where the director of photography imposes a desired temporal and emotional reality onto an unpredictable environment. It’s a craft of ‘temporal forgery,’ where high noon can be sculpted to look like dawn, and inconsistent sunlight can be tamed into a steady, poetic glow. This is not just technical problem-solving; it is a fundamental artistic act.
This guide moves beyond the basics to explore the techniques and mindset needed to achieve this illusion. We will deconstruct the challenges posed by each part of the day and provide the strategies to control light direction, quality, and color. From wielding massive silks to disciplined color temperature management and leveraging the aesthetics of classical art, you will learn to turn the sun from an adversary into a predictable, sculptable source for your cinematic vision.
To navigate this deep dive into the craft of light, the following sections will systematically break down the core challenges and their professional solutions. This structure is designed to build your understanding from the fundamental problems to the most advanced creative applications.
Summary: The Artifice of Light: Mastering Continuity from Dawn to Dusk
- Why Shooting at High Noon Ruins Continuity for Morning Scenes?
- How to Use Overhead Silks to Mimic Cloud Cover on Sunny Days?
- Practicals or Cinema Lights: Which Blends Better in Low-Light Scenes?
- The Kelvin Mistake That Makes Afternoon Shots Look Like Evening
- Scheduling for Golden Hour: The Shot List Order That Maximizes Magic Light
- How Lighting Temperature Alters the Perception of Classical Paintings?
- The Lighting Mistake That Kills the Emotional Impact of Warm Colors
- Creating Believable Sci-Fi Worlds on a Limited Indie Budget?
Why Shooting at High Noon Ruins Continuity for Morning Scenes?
Shooting at high noon is the cardinal sin of lighting continuity. The sun, positioned directly overhead, creates the least flattering and most problematic light for cinematic storytelling. Unlike the soft, directional light of the morning or late afternoon, midday light is harsh, vertical, and produces deep, sharp shadows directly under facial features—a phenomenon often called “raccoon eyes.” This top-down quality flattens the subject, removing the sense of depth and shape that is essential for compelling portraiture and creating a visual style that clashes violently with scenes shot earlier or later in the day.
The primary issue is a fundamental mismatch in light direction and quality. A scene established with the warm, low-angle light of a morning shot possesses a gentle, wrapping quality. When you cut to a reverse angle shot at noon, the light is not only a different color (cooler and bluer) but its steep angle creates an entirely different facial geography. This jarring shift in shadow patterns is an immediate signal to the audience that the two shots were filmed at different times, completely shattering the illusion of a continuous moment.
Furthermore, high noon eliminates the potential for creating mood through shadow. The long, elegant shadows of golden hour can be used to sculpt the landscape and frame characters, adding layers of subtext and visual interest. At noon, shadows are compressed and hidden beneath objects and people, resulting in a stark, overly bright, and information-heavy image that feels more like a documentary snapshot than a curated cinematic frame. Attempting to match this to a softly lit morning scene is a losing battle from the start.
Therefore, the professional’s first rule of continuity is not to “fix” noon light, but to avoid it or, when unavoidable, to completely transform it.
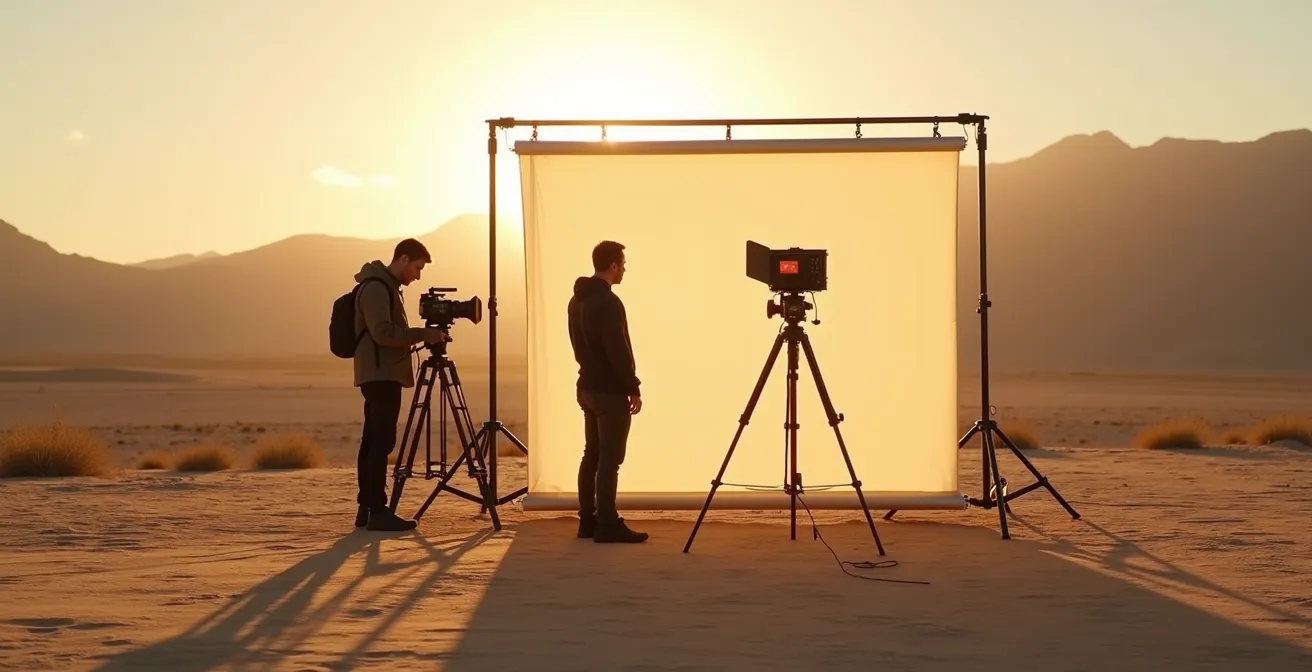
How to Use Overhead Silks to Mimic Cloud Cover on Sunny Days?
When avoiding the midday sun is not an option, the next best strategy is to control its quality. This is where overhead diffusion, particularly large silks or grid cloths, becomes an indispensable tool. The goal is to transform the harsh, direct sunlight into a broad, soft source that mimics the quality of a consistently overcast sky. By placing a large silk—often 20’x20′ or larger, flown on a condor or supported by stands—between the sun and your subject, you effectively create your own personal cloud, providing a consistent quality of light that can be maintained for hours.
The key to making this look natural is to think beyond simply softening the light. A common mistake is to place the subject directly under the center of the silk, which can create a flat, shadowless look reminiscent of a studio softbox. The real art lies in using the silk to create a gentle gradient of light.
Case Study: The Naturalism of ‘The Revenant’
Cinematographer Emmanuel Lubezki’s work on The Revenant is a masterclass in large-scale natural light control. To maintain a consistent, soft light source during chaotic and unpredictable weather, the crew utilized massive silks and reflectors. Crucially, they often positioned actors at the very edge of the silk’s coverage. This technique allowed the key side of the face to receive the soft, diffused light from the silk while the fill side fell off into a more natural, subtle shadow, avoiding an artificial “lit” look. This created a beautiful, natural-looking gradient that felt organic to the harsh environment.
In addition to silks, negative fill is a critical partner. Once you’ve created your large, soft source with a silk, the ambient light can still bounce around and fill in shadows too much, making the image feel flat. By using large black flags or solids on the opposite side of the key light, you can subtract this ambient “bounce,” carving out shadows and restoring a sense of shape, direction, and contrast to the face and scene. This combination of adding soft light and subtracting unwanted fill is the foundation of sculpting natural light on location.
Ultimately, using silks isn’t just about damage control; it’s about taking active control of the environment to create a consistent and beautifully shaped light that serves the story, regardless of what the sun is doing.
Practicals or Cinema Lights: Which Blends Better in Low-Light Scenes?
When moving into low-light or interior scenes, the challenge of continuity shifts from fighting the sun to seamlessly blending artificial sources. The central question becomes whether to rely on practicals—lights that exist as part of the scene, like table lamps, overhead fixtures, or candles—or to use dedicated cinema lights positioned off-camera. The most sophisticated approach is not a choice between the two, but a symbiotic integration of both, where practicals provide motivation and cinema lights provide the necessary exposure and shaping.
Practicals are the key to believability. An audience intuitively accepts light that appears to come from a visible source within the frame. A character lit by a warm glow with a table lamp beside them feels natural. However, practicals alone are rarely sufficient. A standard 60W bulb might look correct to the eye, but it often lacks the intensity and quality needed for a cinematic exposure. It can create harsh hot spots and fail to illuminate the scene adequately.
This is where cinema lights come in. Their role is to augment and enhance the light motivated by the practical. For example, a large, soft LED panel gelled with CTO (Color Temperature Orange) can be positioned just off-camera, mimicking the direction and color of the practical lamp but providing a much broader, more flattering, and controllable source of light for the actor’s face. The practical provides the *why*; the cinema light provides the *how*.
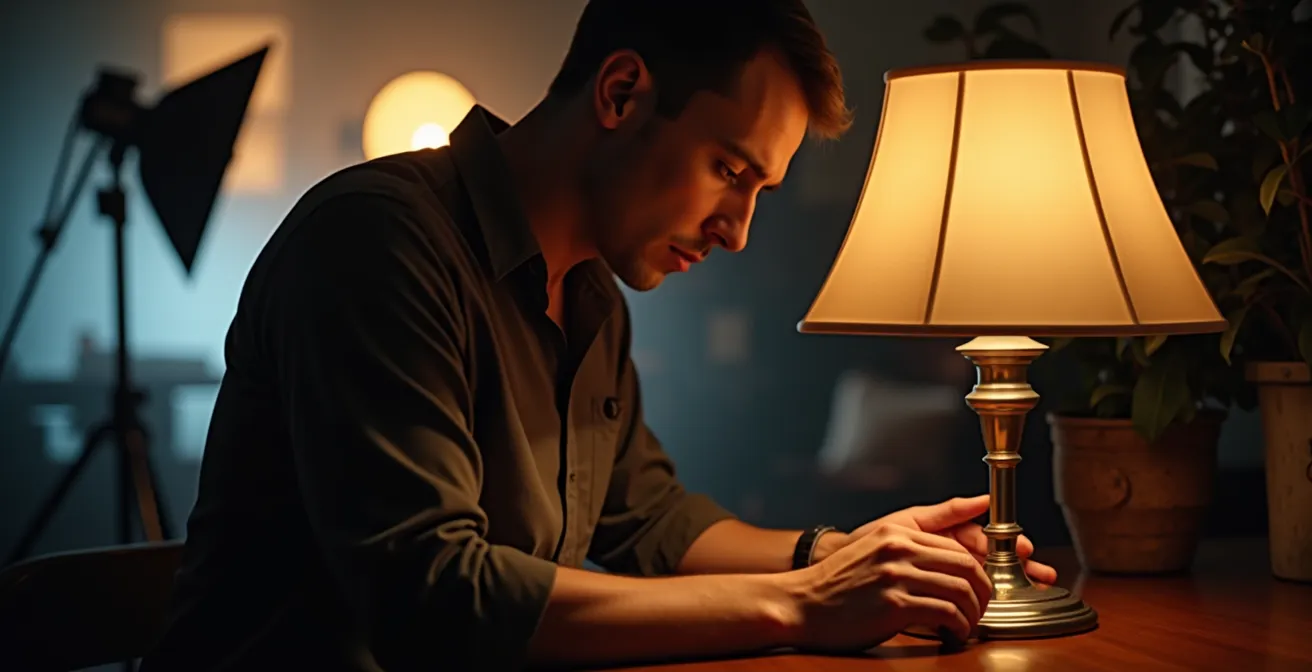
The art of this blend lies in subtlety. The cinema light should feel like an extension of the practical, not a separate, competing source. This means carefully matching the color temperature, ensuring the direction of the light is logical, and controlling its intensity so it doesn’t overpower the practical source. By dimming the practical to a level where it doesn’t blow out on camera and using a more powerful cinema light for the heavy lifting, you achieve a look that is both beautiful and believable.
This technique allows the cinematographer to maintain perfect control over exposure and mood while rooting the scene in a tangible, believable reality.
The Kelvin Mistake That Makes Afternoon Shots Look Like Evening
One of the most insidious continuity errors stems from a misunderstanding of color temperature, or Kelvin. Many filmmakers mistakenly believe that setting the camera’s white balance is all that’s needed to manage color. However, this fails to account for the dramatic and often mixed-quality of natural light. A common and fatal error is shooting in open shade on a sunny afternoon and setting the white balance to “daylight” (around 5600K). This creates an image that looks unnaturally blue, often resembling twilight or a “day-for-night” effect, which will not cut with a shot filmed in direct sun.
The reason for this is that the color of light in open shade is not neutral daylight; it’s primarily composed of reflected light from the blue sky. This can result in a light source with a color temperature that can reach 7000K or higher. When your camera is balanced for 5600K, it renders this 7000K light as distinctly blue, creating a cold, somber mood that is often the opposite of what’s intended for a sunny afternoon scene. This is a tell-tale sign of amateur cinematography.
True Kelvin discipline goes beyond the camera’s menu. It involves a two-pronged approach: correctly setting the camera’s white balance as a baseline, and then using physical gels on your lights to either match or contrast with the ambient color temperature for artistic effect. Relying on white balance alone is a reactive measure; professional control is proactive.
Case Study: The Color Contrasts of ‘Eyes Wide Shut’
Stanley Kubrick’s Eyes Wide Shut is an object lesson in deliberate color temperature management. Cinematographer Larry Smith didn’t just point a camera at a scene. To create the iconic deep blue moonlight pouring through windows, the team used powerful HMI lights gelled with blue outside, mimicking an extremely high Kelvin value. This was contrasted with the very warm, orange-toned tungsten light used for the interiors. This powerful color contrast, a key part of the film’s psychological mood, was achieved by physically gelling light sources, not by simply adjusting the camera’s white balance. It was a conscious, artistic construction of color reality.
By understanding that open shade is blue and direct sun is yellow/neutral, and by using gels to correct or artistically manipulate these colors at the source, the cinematographer can forge a consistent and intentional color narrative.
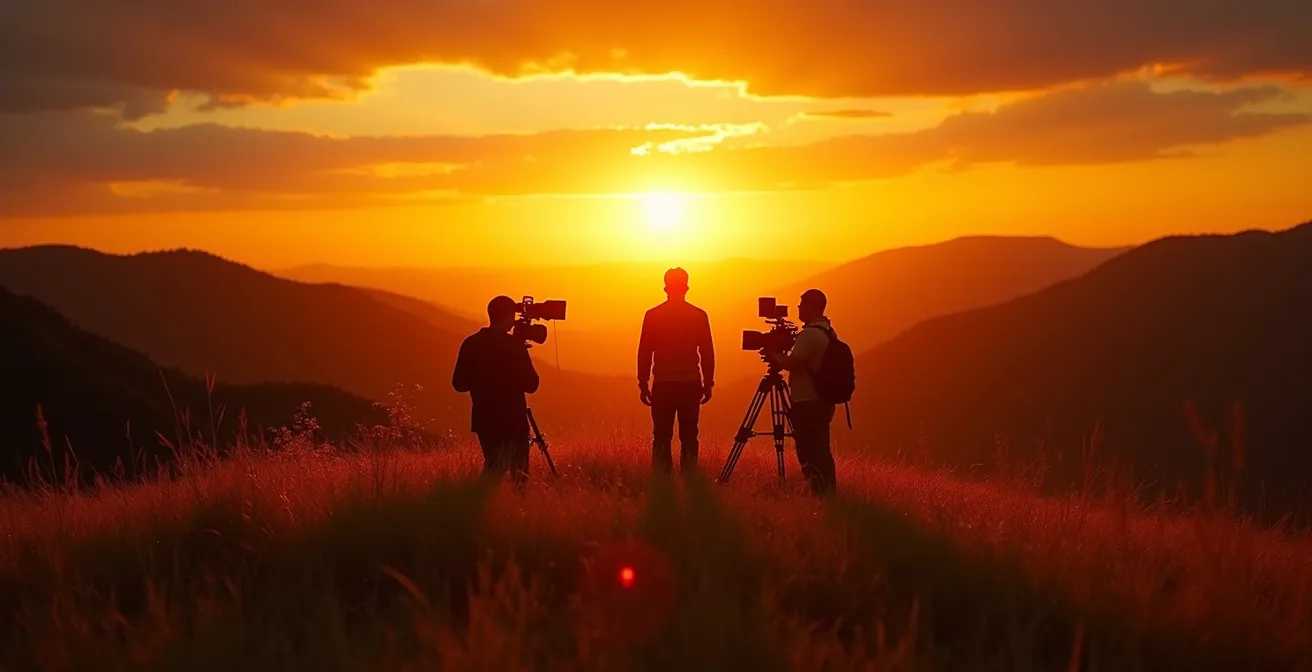
Scheduling for Golden Hour: The Shot List Order That Maximizes Magic Light
The “golden hour”—that fleeting period shortly after sunrise and before sunset—offers the most sought-after light in cinematography. Its warm color, soft quality, and long, dramatic shadows create images of unparalleled beauty. However, its brevity is its greatest challenge. Maximizing this magic light isn’t about luck; it’s about rigorous, intelligent scheduling and a specific shooting strategy known as the “inverse pyramid.”
The inverse pyramid strategy dictates that you shoot your most complex and widest shots first, when the light is at its absolute peak. This means prioritizing the establishing shots, wide masters, and complicated crane or dolly moves that capture the full glory of the landscape and the actor within it. These shots are the most dependent on the perfect quality of natural light and are the hardest to replicate with artificial means.
As the light begins to change and fade, you move progressively “down the pyramid” to tighter coverage. Medium shots are next, as they are less dependent on the overall landscape and can be more easily controlled with bounce cards and reflectors to maintain consistency. Finally, the close-ups and inserts are reserved for the very last moments of usable light. At this point, the natural light may be almost gone, but a close-up can be almost entirely controlled with a small, well-placed LED or a bounce card, allowing you to perfectly match the look and feel of the wider shots captured earlier.
This method requires meticulous planning, as demonstrated in the production of The Revenant, where entire shoot days were planned around capturing specific coverage during matching golden hour conditions across multiple days. Extensive location scouting and the use of stand-ins for light tests are non-negotiable elements of this professional approach.
Action Plan: The Inverse Pyramid Strategy for Golden Hour
- Start with your widest, most complex establishing shots when the light is perfect and directional.
- Move to medium shots as the light begins to soften and change; these are easier to augment with reflectors.
- Reserve all close-ups for the last 15-20 minutes, where you can fully shape the light with bounce or a small LED.
- Schedule any reverse angles for the opposite golden hour (i.e., shoot one side at sunset, the reverse at sunrise the next day).
- Plan for transitional or “magic hour” shots to be captured during the blue hour immediately following sunset.
By front-loading the complexity, you ensure that you capture the irreplaceable shots first and save the more controllable elements for last, transforming a race against time into a calculated, efficient process.
How Lighting Temperature Alters the Perception of Classical Paintings?
The principles of cinematic lighting are not new; they are an extension of a dialogue that artists have been having with light for centuries. To truly understand how to use light for emotional effect, a cinematographer can learn immensely from studying the masters of classical painting. Artists like Vermeer, Rembrandt, and Caravaggio were masters of light, using its direction, quality, and color to guide the viewer’s eye, reveal character, and create profound emotional depth. Their canvases are, in effect, the first storyboards for lighting.
Color temperature, in particular, was a tool they wielded with intent. The warm, golden glow of candlelight in a Georges de La Tour painting evokes intimacy, spirituality, and quiet contemplation. The cool, crisp blues of outdoor light in a work by Monet suggest a specific time of day and a feeling of fresh, open air. These artists understood that warm light advances and cool light recedes, and they used this to construct compositional depth and emotional narratives. A warm, candlelit face against a cool, blue-lit window immediately creates a sense of interior safety versus the cold world outside.
Case Study: The Painterly Lighting of ‘Barry Lyndon’
Stanley Kubrick’s Barry Lyndon stands as the ultimate homage to this artistic lineage. Determined to recreate the aesthetic of 18th-century paintings, Kubrick and cinematographer John Alcott shot interiors using almost exclusively candlelight. As detailed in examinations of the film’s techniques, they used specially developed, ultra-fast f/0.7 Zeiss lenses to capture images in these extremely low-light conditions. The result is a film that “breathes” with the warm, soft, and directional quality of a painting by Vermeer or Gainsborough, maintaining this painterly lighting continuity throughout its interior scenes and proving that an entire film’s visual language can be built on historical artistic principles.
This connection reinforces the core idea that realism is a stylistic choice, not an obligation. As cinematographer David Mullen eloquently states:
Movies are all about illusion, even the illusion of realism. Realism is just another form of artifice that may or may not be appropriate for the film.
– David Mullen, No Film School
By studying how painters used color temperature to convey emotion, a modern cinematographer can move beyond mere technical correctness and begin to light with true artistic purpose.
The Lighting Mistake That Kills the Emotional Impact of Warm Colors
Warm colors—golds, oranges, deep reds—are a powerful tool in a cinematographer’s emotional palette. They can evoke feelings of love, nostalgia, safety, and passion. However, they are also incredibly fragile and easily undermined by a common and destructive mistake: cool light contamination. This occurs when unwanted blue or cyan light from an ambient source, like a north-facing window or an overcast sky, spills into a scene that is meant to be exclusively warm, killing the intended mood.
The human eye is excellent at compensating for mixed lighting, but the camera is brutally honest. It will faithfully record the subtle blue fill light creeping into the shadows of a scene lit with warm tungsten or CTO-gelled lights. This creates a muddy, conflicted image. Instead of a pure, immersive feeling of warmth, the audience is left with a scene that feels visually dissonant and emotionally unclear. The impact is subconscious but powerful; the intended feeling of safety or intimacy is tainted by a subtle coldness.
The challenge is amplified by the sheer volatility of natural light. Throughout a single day, natural light can change color temperature by up to 3000K, shifting dramatically from the warm tones of sunrise to the cool blues of midday shade. To protect a warm aesthetic, a cinematographer must be vigilant. This means physically blocking or flagging off offending light sources. A north-facing window introducing blue skylight into a cozy, fire-lit interior must be covered with a black-out or gelled with CTO to match the interior’s warmth. Negative fill becomes essential outdoors to block blue skylight from reflecting into the shadow side of a face during a golden hour shot.
True control over a warm palette also means relying on gels over camera settings. Instead of dialing a high Kelvin value into the camera to “warm up” the image—which warms up everything, including unwanted blue spill—the professional approach is to keep the camera balanced for the key light (e.g., 3200K for tungsten) and use Color Temperature Orange (CTO) or Color Temperature Straw (CTS) gels on the lights themselves to create the desired level of warmth. This maintains clean, pure colors and gives you precise control over the emotional tone.
By actively identifying and eliminating sources of cool light contamination, you preserve the emotional purity of your warm scenes and ensure their intended impact is felt by the audience.
Key Takeaways
- Cinematic continuity is a constructed illusion, not a documentary record of reality; your job is to create, not just capture.
- Control harsh sunlight by creating your own large, soft source with overhead silks and then add shape by subtracting ambient light with negative fill.
- Master color temperature with physical gels (CTO, CTB) on your lights, using the camera’s white balance only as a neutral baseline, not a primary creative tool.
Creating Believable Sci-Fi Worlds on a Limited Indie Budget?
The principles of lighting continuity are often stretched or deliberately broken in the science-fiction genre. On a large-budget production, this can be achieved with massive sets and extensive VFX. For an indie filmmaker, however, budget limitations demand creative solutions. The key is to turn continuity challenges into world-building features by establishing a set of unique, internal “rules of light” for your alien environment.
Instead of fighting the changing sun, you can embrace “controlled inconsistency” as a storytelling device. Does your alien planet have two suns? This immediately justifies a double-shadow look and allows for shifts in light color as one sun sets before the other. Is the world perpetually shrouded in a thick, colored atmosphere? This provides a narrative reason for all exterior light to be heavily diffused and tinted with a specific hue, a look that can be achieved inexpensively with colored window films or by shooting exclusively on overcast days.
These established rules create a new baseline for continuity. The audience will accept lighting that would feel like an error in a contemporary drama because it is consistent with the physics of the world you have built. This allows for immense creative freedom and turns limitations into strengths.
Case Study: Low-Budget Sci-Fi Innovation
Independent sci-fi films have become masters of budget-conscious world-building through light. Many filmmakers utilize affordable RGB LED tubes and strips, hidden throughout sets, to create a consistent alien glow that is unaffected by the changing natural light outside. This allows them to shoot for an entire day while maintaining a believable “perpetual twilight” or otherworldly ambiance. Inexpensive projectors displaying abstract video loops or patterns can simulate alien data streams or atmospheric phenomena, adding production value and visual complexity for a fraction of the cost of VFX. By defining a unique visual language, these films make their budget a non-issue.
Take these principles of artifice and control to your next project, and begin sculpting light with intention, turning the unpredictable sun into your most powerful storytelling tool.